

One of the most common pitfalls when creating 3D props for game engines like Unity or Godot is dealing with scale. If you’ve ever exported a standard dining table from Maya only to find it towering over your game level like a skyscraper, you’ve run into the classic unit mismatch.
In this post on Terminal Notes, we’ll break down the standard dimensions for modeling a table and chair, how to resolve the scale mismatch between Maya and your game engine, and how to set up your grid so your props don’t look awkwardly massive on your screen.
1. Standard Dimensions for Furniture
Whether you prefer working in centimeters (Maya’s default) or meters (Unity/Godot’s default), keeping your models grounded in real-world measurements is critical. Here are the block-out dimensions for a standard 4-person dining set:
| Furniture Part | Dimensions (Centimeters) | Dimensions (Meters) |
| Table Top | 150cm (W) x 5cm (H) x 90cm (D) | 1.5m (W) x 0.05m (H) x 0.9m (D) |
| Table Legs | 5cm (W) x 70cm (H) x 5cm (D) | 0.05m (W) x 0.70m (H) x 0.05m (D) |
| Chair Seat | 45cm (W) x 5cm (H) x 45cm (D) | 0.45m (W) x 0.05m (H) x 0.45m (D) |
| Chair Legs | 4cm (W) x 40cm (H) x 4cm (D) | 0.04m (W) x 0.40m (H) x 0.04m (D) |
Pro Tip: Grounding your assets
Always ensure the absolute bottom of your furniture legs sit perfectly at Y = 0. If your table is 75cm tall and the pivot is dead-center, set your Translate Y to 37.5. Alternatively, press
Dand holdVto snap your pivot to the bottom vertices of the mesh, then set Translate Y to 0.
2. Solving the Unity & Godot Scale Dilemma
Maya defaults to centimeters (1 unit = 1cm), while game engines like Unity and Godot default to meters (1 unit = 1m). If you export a 150cm table without adjusting settings, the engine reads it as 150 meters. Here are the two standard workflows to fix this:
Workflow 1: Change Maya to Meters (Recommended)
If you want exact 1:1 parity with your game engine out of the box, adjust Maya’s working units before blocking out your mesh.
- Go to Windows > Settings/Preferences > Preferences.
- Select Settings in the left-hand menu.
- Under Working Units, change the Linear drop-down from Centimeter to Meter.
Workflow 2: Keep Maya in CM, Adjust on Export
If you prefer working with whole numbers (like 150) rather than decimals (like 1.5) for fine modeling details, leave Maya in centimeters and handle the conversion during FBX export.
- When exporting your FBX, scroll down to Advanced Options > Units.
- Uncheck “Automatic” and ensure it is set to convert to Centimeters.
- When importing into Unity, the engine will automatically apply a Scale Factor of 0.01 to the mesh in the import settings, perfectly shrinking your 150cm asset down to 1.5m.
3. Fixing the Tiny Grid Illusion
If you build a 150cm table using Maya’s default grid, it will look massive. This isn’t because the table is too big—it’s because Maya’s default grid is only 24 centimeters wide! To model comfortably at real-world scale, you need to expand your working area.
Here are the ideal grid settings for furniture modeling:
- Go to Display > Grid (click the options box
❒next to it). - Length and width: Set to
500units (creates a 5×5 meter space). - Grid lines every: Set to
100units (draws a major line every 1 meter). - Subdivisions: Set to
10(draws minor snapping lines every 10 centimeters).
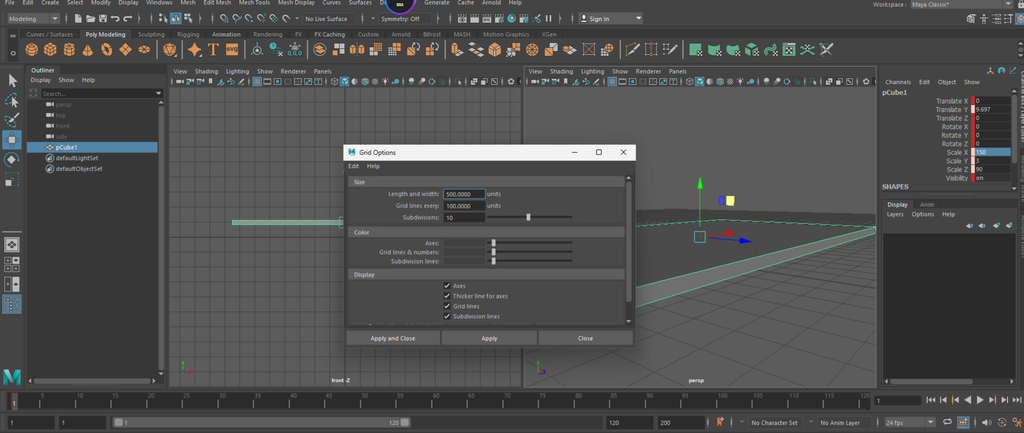
Once applied, select your table and press F on your keyboard to re-frame the camera. Your 150cm table will now look like a perfectly normal piece of furniture sitting naturally in a room-sized environment.
Do you want to add a section about assigning basic materials before exporting, or is this good to go as-is?