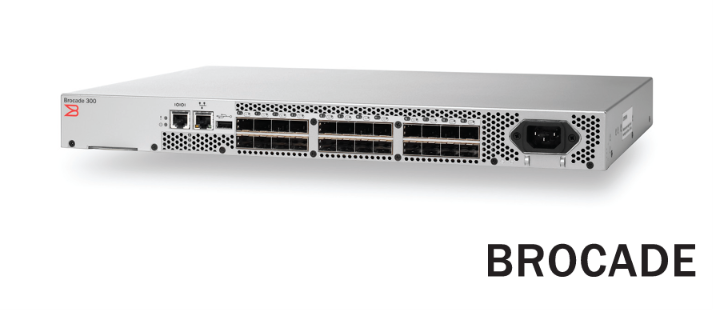
Welcome back to Terminal Notes. If you spend most of your day deep in Kubernetes manifests, Terraform state files, or AWS control planes, suddenly being handed a physical fiber cable and a legacy Brocade SAN switch can feel like a sudden trip back in time.
But beneath the archaic serial cables and unfamiliar CLI, Fibre Channel (FC) Storage Area Networks (SANs) operate on concepts that map perfectly to modern cloud networking. Today, we are demystifying Brocade (and OEM equivalents like the IBM DS300) SAN switch configuration—from the first serial login to linking fabrics via E-Ports.
1. Translating SAN Concepts for the Cloud Native
Before we touch the CLI, let’s translate the core SAN terminology into modern infrastructure concepts.
The Identifiers: WWN, WWNN, and WWPN
In Ethernet networks, physical devices are identified by MAC addresses. In a Fibre Channel SAN, devices use World Wide Names (WWNs)—unique 64-bit addresses hardcoded into the hardware.
- WWNN (World Wide Node Name): Identifies the physical hardware chassis (e.g., the server’s Host Bus Adapter or the storage array controller).
- WWPN (World Wide Port Name): Identifies the specific port on that node. Because enterprise hardware relies on redundancy, each node usually has multiple ports, each with its own WWPN.
Best Practice: SAN switches are almost always configured using WWPNs.
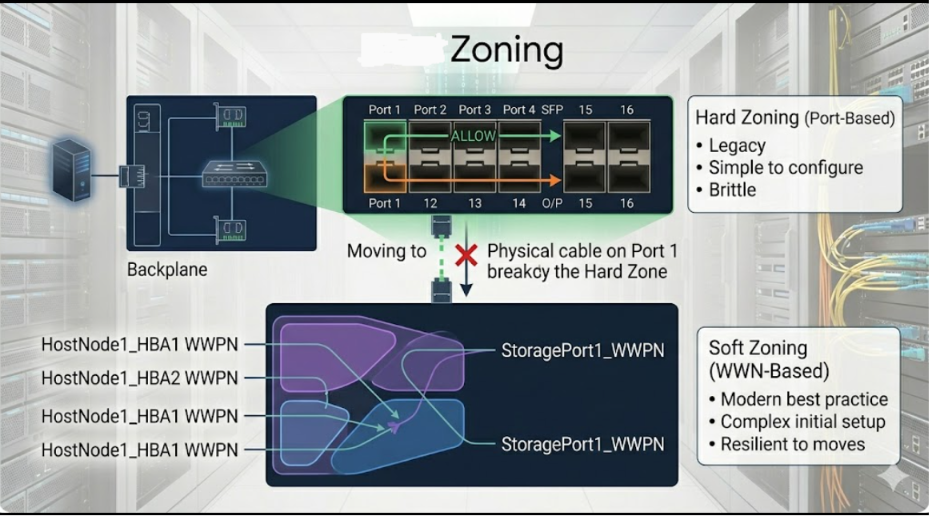
Security Groups for Storage: Hard vs. Soft Zoning
By default, plugging a server and a storage array into the same SAN switch does nothing. They cannot see each other until you explicitly permit traffic via Zoning. Think of Zoning as your AWS Security Groups or Kubernetes Network Policies.
- Soft Zoning (WWN Zoning): The modern industry standard. You create zones using the WWPNs of the devices. If you physically move a server’s fiber cable from switch Port 2 to Port 10, the connection survives because the switch routes based on the WWPN.
- Hard Zoning (Port Zoning): Legacy configuration based on physical switch ports (e.g., “Allow Switch Port 1 to talk to Port 5”). If a cable gets moved, the connection breaks. Avoid this.
2. Surviving the Serial Console
You can’t manage a switch remotely until it has an IP address. That means starting with a physical console cable (typically an FTDI chipset, like the CDM2123620) plugged into your laptop via USB.
Identifying the Right Port: Look at the port side of your switch. You will likely see two standard RJ45 ports next to your SFP fiber cages.
- The Network Tree Icon (
|0|0|0|): This is your 10/100 Ethernet Management port. Do not plug your console cable in here. - The Serial Icon (
|O|O|): This is your serial console port. Plug the RJ45 end of your console cable here.
The Golden PuTTY Settings: If your cable shows up in Device Manager (e.g., on COM4) but your terminal emulator is giving you a blank screen or garbled text, check your serial settings. Brocade defaults to:
- Speed (Baud Rate): 9600 (If it’s garbled, try 115200 or 38400)
- Data bits: 8 | Stop bits: 1 | Parity: None
- Flow Control: None (Crucial: If this is set to XON/XOFF, your terminal will freeze and refuse keystrokes).
3. Initial Provisioning: Names and IPs
Once you have a CLI prompt, log in as the admin user.
Setting the Switch Name: Give the switch a recognizable hostname (up to 30 characters, no spaces). This change is instant and non-disruptive.
Bash
switchname "SW_Core_FabricA"
Assigning the Management IP: To ditch the serial cable, configure the Out-of-Band (OOB) Ethernet management port using the interactive ipaddrset command. Leave DHCP off; infrastructure needs static IPs.
Bash
ipaddrset
Follow the prompts to enter your Management IP, Subnet Mask, and Gateway. Verify it took effect by running ipaddrshow.
4. Enabling SSH Remote Access
SSH is enabled by default on Brocade switches, but if your connection is being refused after setting the IP, the switch is likely missing its RSA cryptographic host keys (common after factory resets).
Generate new keys via your serial console. Depending on your Fabric OS (FOS) version, use one of these commands:
Modern FOS:
Bash
seccryptocfg --default -type RSA
Legacy FOS:
Bash
sshutil genkey -rsa -keysize 2048
Once the keys generate, you can unplug your serial cable and SSH in on Port 22.
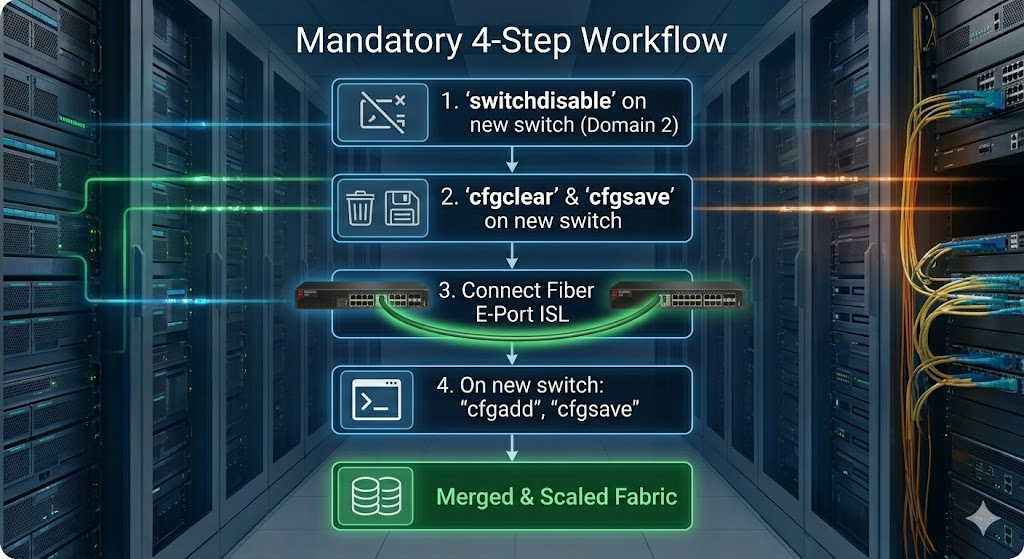
5. Merging Fabrics: ISLs and E-Ports
Eventually, you will need to connect two switches together to expand your fabric. Connecting a fiber cable between two switches creates an Inter-Switch Link (ISL), and the ports will auto-negotiate into E-Ports (Expansion Ports).
When connected, the switches will automatically merge their zoning databases. However, this will fail if both switches have the same Domain ID.
How to link them safely without a Domain Overlap: Before connecting the fiber cable, prepare the new switch so it accepts the configuration of the old (Principal) switch.
- Change the Domain ID on the new switch:Bash
switchdisable configure(Press enter to skip to “Fabric parameters”, typey, enter a unique Domain ID, and skip through the rest).Bashswitchenable - Wipe the new switch’s zoning database to avoid conflicts:Bash
cfgdisable cfgclear cfgsave - Plug in the fiber cable. The ports will become E-Ports, the fabrics will merge, and the new switch will automatically pull the zoning configuration from the old switch. Verify with
fabricshowandcfgshow.
6. The Brocade Configuration Hierarchy
Once you are up and running, all zoning configurations follow a strict, bottom-up workflow:
- Aliases (
alicreate): Map human-readable names to WWPNs.- Example:
alicreate "Host1_HBA", "10:00:00:90:fa:47:e9:f1"
- Example:
- Zones (
zonecreate): Group aliases together to allow communication. Single-initiator zoning (one host mapped to storage) is best practice.- Example:
zonecreate "z_Host1_Storage", "Host1_HBA;Storage_CtrlA"
- Example:
- Configurations (
cfgcreate/cfgadd): A bucket that holds your active zones.- Example:
cfgcreate "Active_Fabric_Config", "z_Host1_Storage"
- Example:
- Commit and Enable (
cfgsave/cfgenable): Save to NVRAM and push to the live fabric.
Wrapping Up
Master the WWPNs, keep your zoning clean, and ensure your Domain IDs are unique, and your storage fabric will run flawlessly.